---
title: Setup the Reach RS2
description: A GNSS base station is necessary to produce an accurate result from the R2A or R360. Here's how to set up for optimal results:
---
[Skip to content](https://learn.rockrobotic.com/setup-reach-rs2#main-content)
English
Show submenu for translations
![ROCK-robotic-community-logo.png\]](https://learn.rockrobotic.com/hs-fs/hubfs/ROCK-robotic-community-logo.png?width=250&height=50&name=ROCK-robotic-community-logo.png)
- [ROCK Customer Support](https://www.rockrobotic.com/support/)
Open main navigation
Close main navigation
- [ROCK Customer Support](https://www.rockrobotic.com/support/)
- English
Show submenu for translations
- [www.rockrobotic.com](https://www.rockrobotic.com/)
[www.rockrobotic.com](https://www.rockrobotic.com/)
Hello. How can we help you?
- There are no suggestions because the search field is empty.
1. [ROCK Knowledgebase](https://learn.rockrobotic.com/?hsLang=en)
2. [ROCK Base Station](https://learn.rockrobotic.com/rock-base-station?hsLang=en)
3. [Base Data](https://learn.rockrobotic.com/rock-base-station?hsLang=en#base-data)
December 13, 2024
# Setup the Reach RS2
## A GNSS base station is necessary to produce an accurate result from the R2A or R360. Here's how to set up for optimal results:
**1. Ensure No Electronics Nearby**
Keep all electronics at least 6 feet (2 meters) away from the base.
Electronic devices may produce RF noise that could affect the reception of the GNSS signal.
**2. Clear Sky View**
The base station needs to have a clear sky view 30 degrees above the horizon. There should be no obstacles that could block the view like buildings, trees, cars, humans, laptops, etc.
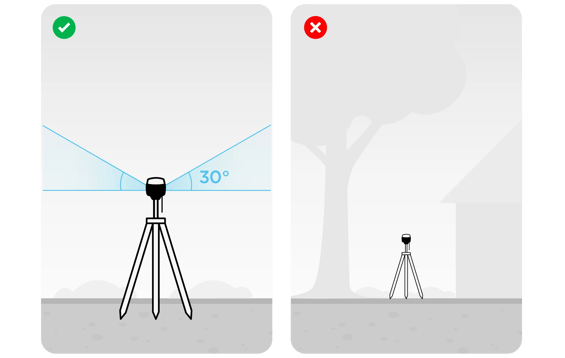
The picture on the left demonstrates desirable conditions for the base location such as:
- open field
- top of the hill
The picture on the right is an example of undesirable surrounding conditions such as
- reduced view of the sky
- possible obstructions, buildings
- nearby vegetation
- under trees
- indoors
**3. Placing Reach RS2**
Place the Reach RS2 on the ground and make sure it's leveled as shown in the photo below.
- If you are setting up base coordinates, place the Reach RS2 precisely above the marked point on the tripod and leveled.
- Here's some images of what a known point may look like in the field:


- Antenna height is measured as the distance between the mark and the antenna reference point (ARP).
- For Reach RS2, consider the antenna height as the distance between the mark and the bottom of Reach RS2 (h in the figure above) plus 134 mm.
- The distance between the Base and the Drone shouldn't exceed 10 km. A general rule of thumb is, you will lose 2 parts in accuracy per million. (e.g., at 16 km you will lose 2 cm of accuracy) Because of this we recommend to always have a base station located within 16 km of your project area.
- If you collect your base station data over a known point, then you will be able to use that known point (converted to WGS 84) when entering your base station location into the ROCK Pre-processing Software.
**4. Reach RS2: First Start**
Watch the video below to update the RS2 firmware.
Check out [Emlid Reach RS2 quick start guide](https://docs.emlid.com/reachrs2/)
**5. Turn on Reach**
Press and hold the power button until all the LEDs light up. When the loading animation stops, Reach RS2 has booted up and is fully available.
**6. Connect to Reach via Wi-Fi and open Emlid Flow**
Make sure that Reach is broadcasting Wi-Fi: the LED must be solid white. Connect to RS2 like to a usual Wi-Fi network. By default login and password are these:
| **Login** | **Password** |
| --- | --- |
| reach:xx:xx | emlidreach |
Check the Wi-Fi LED. Solid blue network LED stands for successful connection to a Wi-Fi network. If it's solid white again, that means Reach switched back to hotspot mode. In this case check that you've entered the information for your Wi-Fi network correctly and try again.
**Emlid Flow App**
- Download the app for iOS or Android. Get it from the App Store, Google Play or scan the QR code on the sticker on top of Reach..
- Open Emlid Flow app. In Emlid Flow you'll see a list of Reach receivers in the same Wi-Fi network as your device. Tap the one you want to work with.
**7. Setup the Reach RS2**
Configure this once and always use these settings.
- Connect to Reach RS2 and open *RTK Settings* tab.
- Set *Positioning mode* to Static.
- Pick each of the satellite systems.
- Set the *Update rate* at 1 Second.
- DO NOT CHECK "THIS LOG IS FOR OPUS" BOX
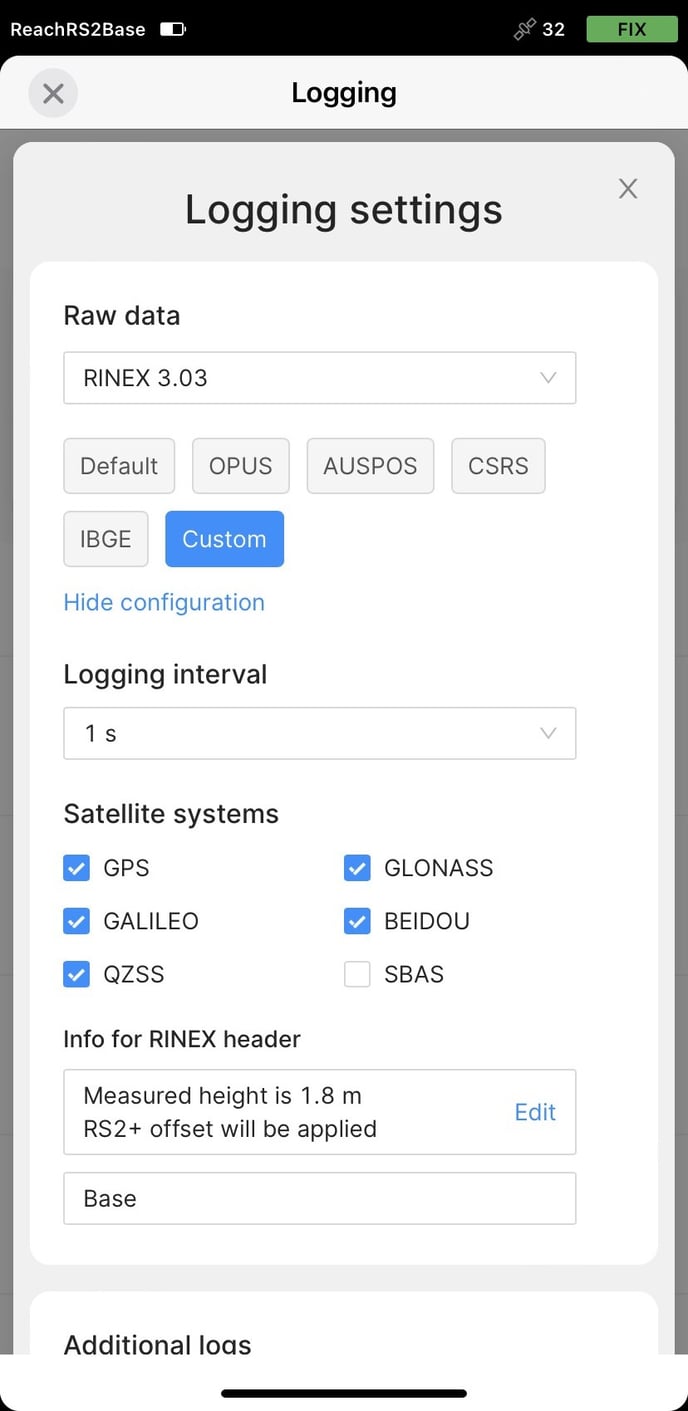
**Enable Logging**
- Open the *Logging* tab.
- Set *Raw data* to Rinex 3.03 and toggle on.
- RINEX is a industry standard for raw data. The log contains GNSS observations from the receiver without calculation of accurate coordinates.
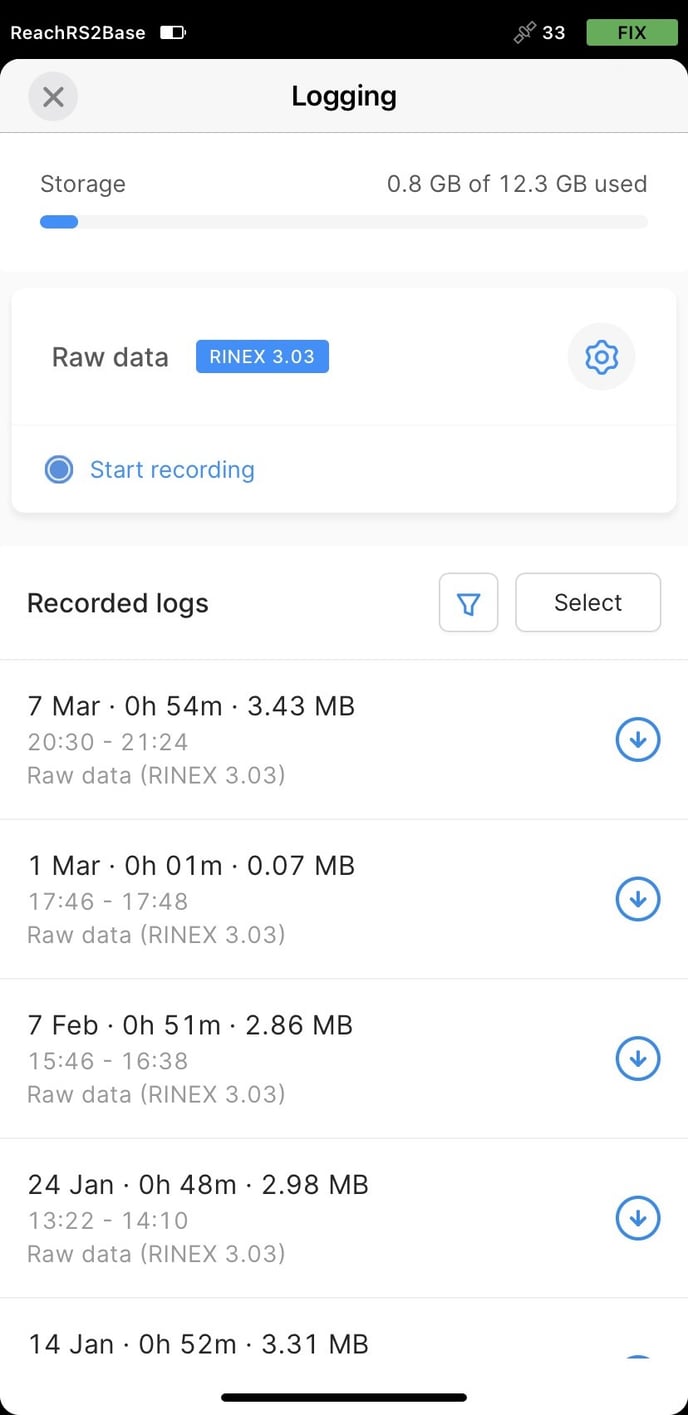
**Downloading**
After completing the survey, save logs to your Mac, Windows, Linux or mobile device.
- Open the Logging tab
- Turn off toggles  to stop recording.
- Find your logs below in the Logging tab.
You can see the recording date and time. There are two buttons on the right side of each log:
-  button saves it.
-  button deletes it.
**Storing the base position**
If you want to reuse the determined base location:
- Carefully mark physical position on the ground
- Save coordinates to manual using the button in the *Base Coordinates* section of the *Base mode* tab
- When using this position next time, accurately place the base station over the mark
- Enter the recorded coordinates manually in Emlid Flow
**Official Documents available at Emlid's website.**
- [Reach RS2 Specification Sheet](http://files.emlid.com/docs/Datasheet%20RS2%20ENG%20web.pdf)
- [Reach RS2 CE Declaration of Conformity](http://files.emlid.com/compliance/CE-Declaration-of-Conformity-Reach-RS2.pdf)
#### **Use the navigation menu below to continue the tutorial.**
| Previous **[USB Drive Specifications](https://learn.rockrobotic.com/usb-drive-specs?hsLang=en)** | ROCK R2A Tutorial **[Retrieve the R2A Data](https://learn.rockrobotic.com/r2a-data-is-stored-on-the-usb-drive?hsLang=en)** |
| --- | --- |
- [ROCK R3 Pro](https://learn.rockrobotic.com/rock-r3-pro?hsLang=en#main-content)
- [Setup](https://learn.rockrobotic.com/rock-r3-pro?hsLang=en#setup)
- [Data collection](https://learn.rockrobotic.com/rock-r3-pro?hsLang=en#data-collection)
- [Updates and Maintenance](https://learn.rockrobotic.com/rock-r3-pro?hsLang=en#updates-and-maintenance)
- [Mobile Mount](https://learn.rockrobotic.com/rock-r3-pro?hsLang=en#mobile-mount)
- [Photogrammetry](https://learn.rockrobotic.com/rock-r3-pro?hsLang=en#photogrammetry)
- [ROCK Desktop](https://learn.rockrobotic.com/rock-desktop?hsLang=en#main-content)
- [Desktop Processing](https://learn.rockrobotic.com/rock-desktop?hsLang=en#desktop-processing)
- [Using ROCK Desktop](https://learn.rockrobotic.com/rock-desktop?hsLang=en#using-rock-desktop)
- [Desktop License](https://learn.rockrobotic.com/rock-desktop?hsLang=en#desktop-license)
- [Desktop Support](https://learn.rockrobotic.com/rock-desktop?hsLang=en#desktop-support)
- [Releases](https://learn.rockrobotic.com/rock-desktop?hsLang=en#releases)
- [ROCK Cloud](https://learn.rockrobotic.com/rock-cloud?hsLang=en#main-content)
- [Overview](https://learn.rockrobotic.com/rock-cloud?hsLang=en#overview)
- [Project Data](https://learn.rockrobotic.com/rock-cloud?hsLang=en#project-data)
- [Managing Projections](https://learn.rockrobotic.com/rock-cloud?hsLang=en#managing-projections)
- [ROCK Cloud Tools](https://learn.rockrobotic.com/rock-cloud?hsLang=en#rock-cloud-tools)
- [Processing](https://learn.rockrobotic.com/rock-cloud?hsLang=en#processing)
- [Deliverables & Exports](https://learn.rockrobotic.com/rock-cloud?hsLang=en#deliverables-exports)
- [General](https://learn.rockrobotic.com/rock-cloud?hsLang=en#general)
- [ROCK SLAM](https://learn.rockrobotic.com/rock-slam?hsLang=en#main-content)
- [SLAM Hardware](https://learn.rockrobotic.com/rock-slam?hsLang=en#slam-hardware)
- [SLAM Data Collection](https://learn.rockrobotic.com/rock-slam?hsLang=en#slam-data-collection)
- [ROCK Colorized SLAM Dock V2](https://learn.rockrobotic.com/rock-slam?hsLang=en#rock-colorized-slam-dock-v2)
- [SLAM Data Alignment](https://learn.rockrobotic.com/rock-slam?hsLang=en#slam-data-alignment)
- [ROCK Base Station](https://learn.rockrobotic.com/rock-base-station?hsLang=en#main-content)
- [ROCK Base Setup](https://learn.rockrobotic.com/rock-base-station?hsLang=en#rock-base-setup)
- [ROCK Network](https://learn.rockrobotic.com/rock-base-station?hsLang=en#rock-network)
- [Base Data](https://learn.rockrobotic.com/rock-base-station?hsLang=en#base-data)
- [ROCK Deliverables](https://learn.rockrobotic.com/rock-deliverables?hsLang=en#main-content)
- [Deliverables](https://learn.rockrobotic.com/rock-deliverables?hsLang=en#deliverables)
- [Ordering](https://learn.rockrobotic.com/rock-deliverables?hsLang=en#ordering)
- [Processing](https://learn.rockrobotic.com/rock-deliverables?hsLang=en#processing)
- [General Knowledge](https://learn.rockrobotic.com/general-knowledge?hsLang=en#main-content)
- [ROCK](https://learn.rockrobotic.com/general-knowledge?hsLang=en#rock)
- [Drones](https://learn.rockrobotic.com/general-knowledge?hsLang=en#drones)
- [GPS / GNSS](https://learn.rockrobotic.com/general-knowledge?hsLang=en#gps-gnss)
- [LiDAR](https://learn.rockrobotic.com/general-knowledge?hsLang=en#lidar)
- [Surveying](https://learn.rockrobotic.com/general-knowledge?hsLang=en#surveying)
- [ROCK R2A & R360](https://learn.rockrobotic.com/rock-r2a-r360?hsLang=en#main-content)
- [Hardware](https://learn.rockrobotic.com/rock-r2a-r360?hsLang=en#hardware)
- [Data Collection](https://learn.rockrobotic.com/rock-r2a-r360?hsLang=en#data-collection)
- [Aerial Data Capture](https://learn.rockrobotic.com/rock-r2a-r360?hsLang=en#aerial-data-capture)
- [Creating Orthomosaics](https://learn.rockrobotic.com/rock-r2a-r360?hsLang=en#creating-orthomosaics)
- [What's New](https://learn.rockrobotic.com/whats-new?hsLang=en)
- [Sales](https://learn.rockrobotic.com/sales?hsLang=en)
- [ROCK Ultra](https://learn.rockrobotic.com/rock-ultra?hsLang=en#main-content)
- [Setup](https://learn.rockrobotic.com/rock-ultra?hsLang=en#setup)
- [Data Collection](https://learn.rockrobotic.com/rock-ultra?hsLang=en#data-collection)
- [Settings](https://learn.rockrobotic.com/rock-ultra?hsLang=en#settings)
[](http://rockrobotic.com)
rockrobotic.com Help Center
Copyright © 2026, ROCK Robotic Inc.