Step 1: Open ROCK Desktop and sign in with your ROCK Cloud Credentials

Step 2: Ensure your license is activated
- If you have a ROCK Desktop PPK Processing Mobile + Aerial License, follow these steps to
activate your processing license if it is not already in use.
- If you have a ROCK Desktop PPK Processing Aerial Only License, insert the license USB Dongle into your processing computer
Step 3: Select "PROCESS ROCK DATA"

Step 4: Select your LiDAR data
- Select the folder you copied from your USB and let ROCK Desktop unpack the data.
- If you pick the wrong folder- ROCK Desktop will tell you it doesn't contain the right data.
- Click on "SELECT FILE" and navigate to your base GPS file (ex. .25o, .obs, .etc).
- MAKE SURE you still have the associated files within the base GPS data folder.
- Click "NEXT" - if you have processed before you'll see text that says "Reprocess Trajectory", this is for if you need to process a different base station file.
- The first time processing, you'll need to agree to the Terms and Conditions on your first use only.
Warning: DO NOT put your data in a cloud syncing folder like Dropbox, OneDrive, Google Drive, etc. You should process locally, without syncing to the cloud, to avoid issues. After processing, you should not have an issue moving to one of these services.

Step 5: Select your trajectory flight lines
- ROCK Desktop will automatically clip the turns off the end of your flight lines and set standard distance and angular offsets. These can all be adjusted with the sliders.
- You can delete flight lines you don't need- like the vertical take off, high speed calibration, figure 8, and the return to home high speed calibration.
- Before removing:

- After deleting the calibration section:
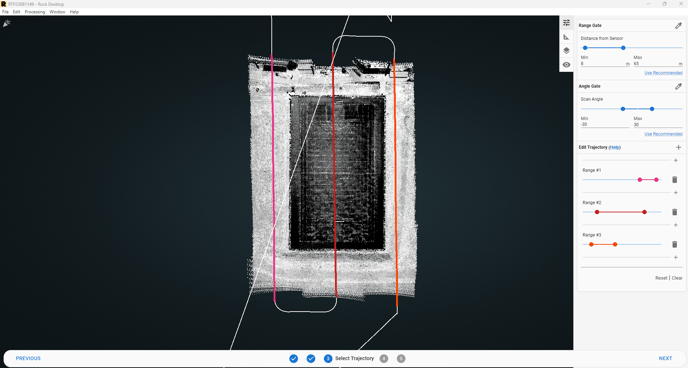
- This step enables you to:
- Add/remove/edit flight lines.
- Adjust the Range Gate- limiting the points to a certain distance from the sensor.
- Adjust the Angle Gate- limiting the points to a certain angle from the laser.
- Using the Layers tab, you can adjust the material displayed, so you can view your data as the Elevation, RGB, Intensity, Intensity Gradient, .etc. Changing the view can allow you to check your data quality during the processing workflow.
- When ready to move on, select "NEXT" in the bottom right hand corner.
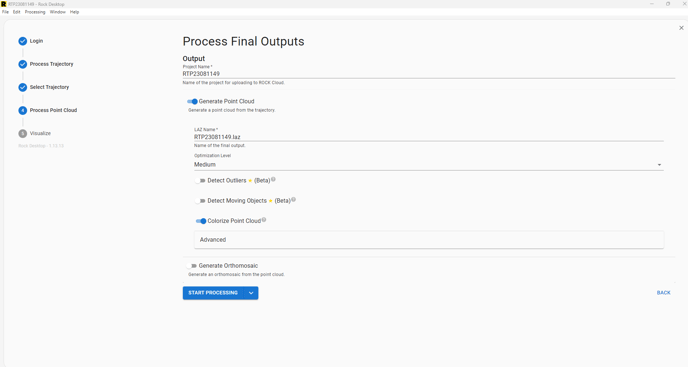
Step 6: Make Process Final Outputs Selections
- Make sure your project and LAZ files have appropriate names.
- Make selections for if you want a point cloud generated, if that point cloud should be colorized, select and optimization level.
- If you have an R3 Pro V2 LiDAR unit, turn on the Generate Orthomosaic option if desired.
- Select "START PROCESSING"
Step 7: Inspect your Colorized Point Cloud!
- Now you can measure items in your point cloud using the measurement toolbar.
- You can change the point cloud display from RGB to intensity or elevation, etc.
- This step also writes the EXIF data to your photos for photogrammetry!
Step 8: Upload to ROCK Cloud
- Select the Cloud Upload button on the bottom of the toolbar on the right side.
- Name your ROCK Cloud project and add a description.
- It will upload and visualize right away in the ROCK Cloud!

Step 9: Order Deliverables in the ROCK Cloud
Done!
There is no LAS export option, but you can use ROCK Cloud to export a LAS if you need one.