Install the R2A properly on the drone system.
- See Installing the R2A/R360 if this step is incomplete.
Tap the button to power on the R2A/R360
- Listen for the camera to click twice, if not heard restart the unit.
- R2A/R360 will begin warm up cycle.
A light humming and ticking sound can be heard from the LIVOX sensor, this is normal.
- Open the Wi-Fi settings on your phone.
-
Connect to the wireless network.
| Wireless Network Name | Password |
| ROCK-####### | rocklidar |
-
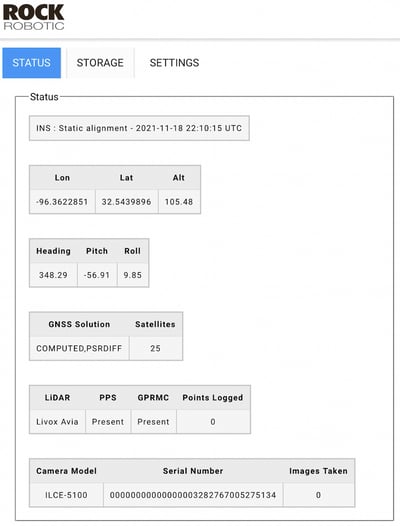
Open up a web browser and go to - 192.168.12.1

- Re-format the USB drive before every flight within the R2A/R360 GUI.
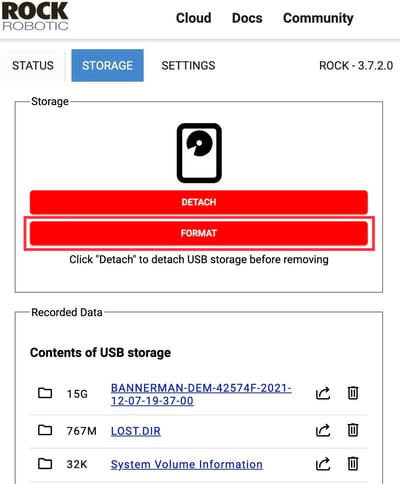
Every data collection session should start with re-formatting your USB drive. Failing to re-format the drive may lead to the inability to log additional data.
The R2A/R360 will not start recording data if the USB drive is not attached or was improperly formatted.
-
Wait until you have 8 or more GNSS satellites.
-
Press "Start" to begin recording data.
- Wait for 20-30 seconds to get a good static reading on the ground.
- Close Web GUI window.
- Turn off phone Wi-Fi to disconnect from R2A/R360 prior to take-off.
Keeping your phone connected to the R2A/R360 Wi-Fi may lead to errors in logging while the R2A/R360 attempts to connect to your phone as it comes in and out of Wi-Fi signal during flight.
**Check your files in the field using the rtk.pcmp file to verify your capture before leaving.**
This can be done without stopping your base station as it is just visualizing the LiDAR scan file, and not a trajectory corrected point cloud. This means no license or internet is needed, but note your point cloud is also inaccurate at this stage.
You can also operate the R2A/R360 using the power button. See the article "Operate the R2A/R360 with Power Button" for more information